PowerConnect Developer Guide
PowerConnect Developer Guide
PowerConnect is a fully customized offline application for tuition and school teachers to manage students’ and parents’ administrative details. While it has limited features at this stage, plans for future PowerConnect releases to update features and usage capabilites have been made with detailed timeline.
The aim of this product is to eventually be a useful tool that is used in conjunction with Learning Managment System (LMS) tools currently in the market to aid teachers in managing students.
PowerConnect is optimized for use via a Command Line Interface (CLI) while still having the benefits of a Graphical User Interface (GUI). PowerConnect helps teachers in tracking and updating students’ particulars.
Table of Contents
- Acknowledgements
- Setting Up, Getting Started
- Design
- Implementation
- Proposed Features
- Documentation, Logging, Testing, Configuration, Dev-ops
-
Appendix
-
Appendix-Requirements
- Product Scope
- User Stories
-
Use Cases
- UC01 - Adding a new student
- UC02 - Adding a grade for a student
- UC03 - Adding a comment for a student
- UC04 - Listing all students in a class
- UC05 - Finding a student in a class
- UC06 - Deleting a student from a class
- UC07 - Adding a new parent/NOK
- UC08 - Editing a parent/NOK
- UC09 - Deleting a parent/NOK
- Non-Functional Requirements
- Glossary
- Appendix-Instructions for Manual Testing
-
Appendix-Requirements
Acknowledgements
- This project is based on the AddressBook-Level3 project created by the SE-EDU initiative.
Setting Up, Getting Started
Refer to the guide Setting up and getting started.
Design
.puml files used to create diagrams in this document can be found in the diagrams folder. Refer to the PlantUML Tutorial at se-edu/guides to learn how to create and edit diagrams.
Architecture
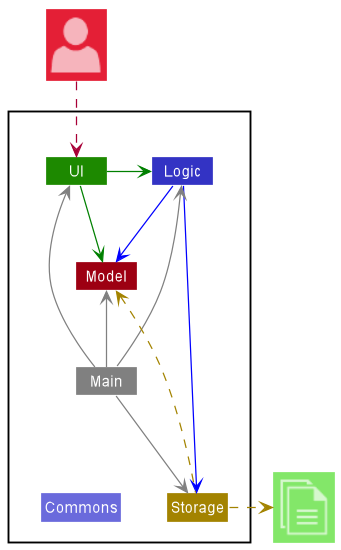
The Architecture Diagram given above explains the high-level design of the App.
Given below is a quick overview of main components and how they interact with each other.
Main components of the architecture
Main has two classes called Main and MainApp. It is responsible for,
- At app launch: Initializes the components in the correct sequence, and connects them up with each other.
- At shut down: Shuts down the components and invokes cleanup methods where necessary.
Commons represents a collection of classes used by multiple other components.
The rest of the App consists of four components.
-
UI: The UI of the App. -
Logic: The command executor. -
Model: Holds the data of the App in memory. -
Storage: Reads data from, and writes data to, the hard disk.
How the architecture components interact with each other
The Sequence Diagram below shows how the components interact with each other for the scenario where the user issues the command delete 1.
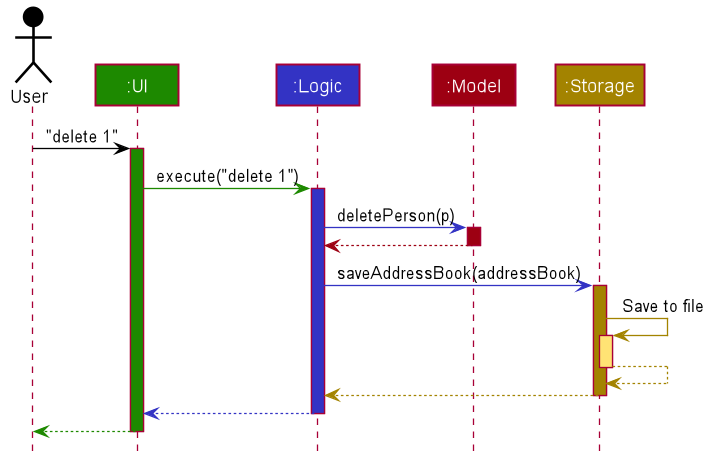
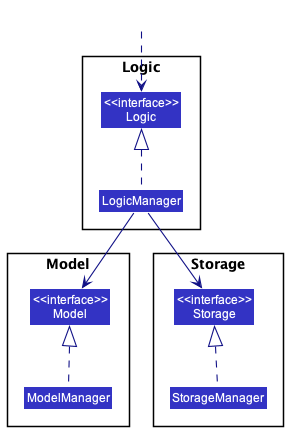
Each of the four main components (also shown in the diagram above),
- defines its API in an
interfacewith the same name as the Component. - implements its functionality using a concrete
{Component Name}Managerclass (which follows the corresponding APIinterfacementioned in the previous point.
For example, the Logic component defines its API in the Logic.java interface and implements its functionality using the LogicManager.java class which follows the Logic interface. Other components interact with a given component through its interface rather than the concrete class (reason: to prevent outside component’s being coupled to the implementation of a component), as illustrated in the (partial) class diagram below.
The sections below give more details of each component.
UI component
The API of this component is specified in Ui.java
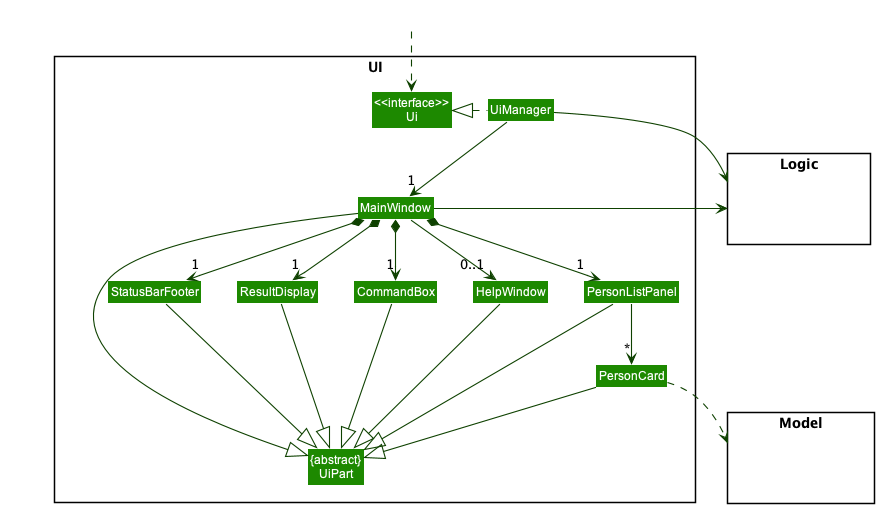
The UI consists of a MainWindow that is made up of parts e.g.CommandBox, ResultDisplay, PersonListPanel, StatusBarFooter etc. All these, including the MainWindow, inherit from the abstract UiPart class which captures the commonalities between classes that represent parts of the visible GUI.
The UI component uses the JavaFx UI framework. The layout of these UI parts are defined in matching .fxml files that are in the src/main/resources/view folder. For example, the layout of the MainWindow is specified in MainWindow.fxml
The UI component,
- executes user commands using the
Logiccomponent. - listens for changes to
Modeldata so that the UI can be updated with the modified data. - keeps a reference to the
Logiccomponent, because theUIrelies on theLogicto execute commands. - depends on some classes in the
Modelcomponent, as it displaysPersonobject residing in theModel.
Logic component
API : Logic.java
Here’s a (partial) class diagram of the Logic component:
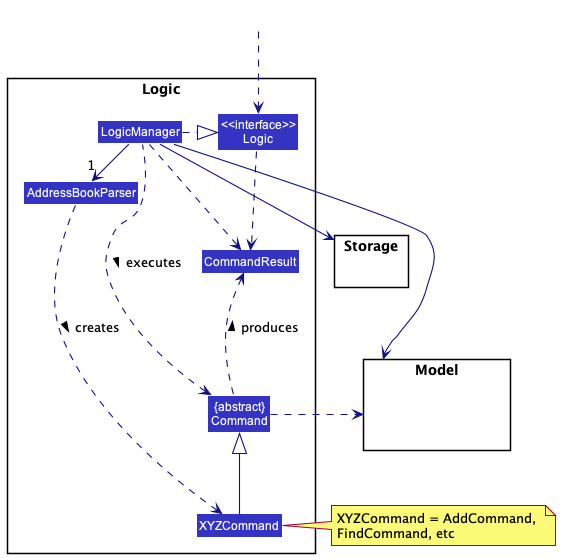
How the Logic component works:
- When
Logicis called upon to execute a command, it uses theAddressBookParserclass to parse the user command. - This results in a
Commandobject (more precisely, an object of one of its subclasses e.g.,AddCommand) which is executed by theLogicManager. - The command can communicate with the
Modelwhen it is executed (e.g. to add a person). - The result of the command execution is encapsulated as a
CommandResultobject which is returned back fromLogic.
The Sequence Diagram below illustrates the interactions within the Logic component for the execute("delete 1") API call.

DeleteCommandParser should end at the destroy marker (X) but due to a limitation of PlantUML, the lifeline reaches the end of diagram.
Here are the other classes in Logic (omitted from the class diagram above) that are used for parsing a user command:
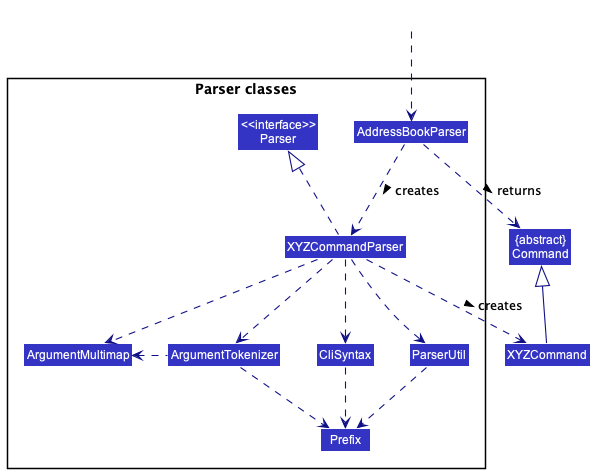
How the parsing works:
- When called upon to parse a user command, the
AddressBookParserclass creates anXYZCommandParser(XYZis a placeholder for the specific command name e.g.,AddCommandParser) which uses the other classes shown above to parse the user command and create aXYZCommandobject (e.g.,AddCommand) which theAddressBookParserreturns back as aCommandobject. - All
XYZCommandParserclasses (e.g.,AddCommandParser,DeleteCommandParser, …) inherit from theParserinterface so that they can be treated similarly where possible e.g, during testing.
Model component
API : Model.java
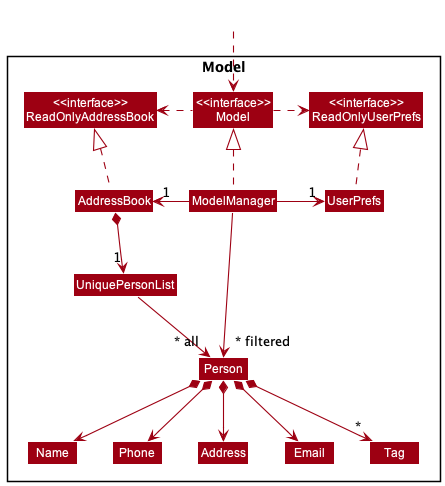
The Model component,
- stores the address book data i.e., all
Personobjects (which are contained in aUniquePersonListobject). - stores the currently ‘selected’
Personobjects (e.g., results of a search query) as a separate filtered list which is exposed to outsiders as an unmodifiableObservableList<Person>that can be ‘observed’ e.g. the UI can be bound to this list so that the UI automatically updates when the data in the list change. - stores a
UserPrefobject that represents the user’s preferences. This is exposed to the outside as aReadOnlyUserPrefobjects. - does not depend on any of the other three components (as the
Modelrepresents data entities of the domain, they should make sense on their own without depending on other components)
Tag list in the AddressBook, which Person references. This allows AddressBook to only require one Tag object per unique tag, instead of each Person needing their own Tag objects.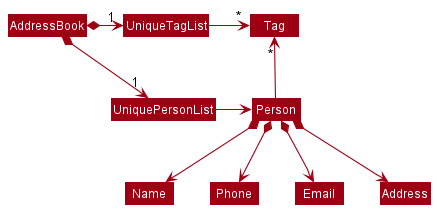
Storage component
API : Storage.java
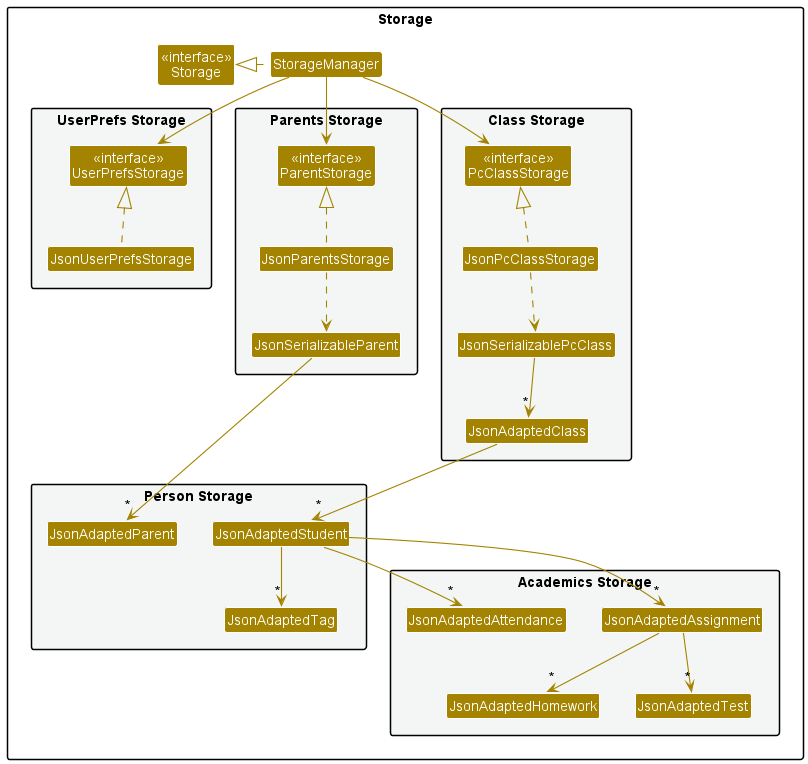
The Storage component,
- can save both address book data and user preference data in json format, and read them back into corresponding objects.
- inherits from both
AddressBookStorageandUserPrefStorage, which means it can be treated as either one (if only the functionality of only one is needed). - depends on some classes in the
Modelcomponent (because theStoragecomponent’s job is to save/retrieve objects that belong to theModel)
Common classes
Classes used by multiple components are in the seedu.addressbook.commons package.
Implementation
This section describes some noteworthy details on how certain features are implemented.
Delete student feature
Current Implementation
PowerConnect allows users to delete a student from the UniqueStudentList of Class.
When the user enters the delete student command, MainWindow#executeCommand() will be called. It will then call
Logic#execute which will return a CommandResult. The execute method is facilitated by StudentDeleteCommand
class. When StudentDeleteCommand#execute is called, it will call deleteStudent() method from model. This would call
removeStudent method from Class which in turn deletes the student from the UniqueStudentList.
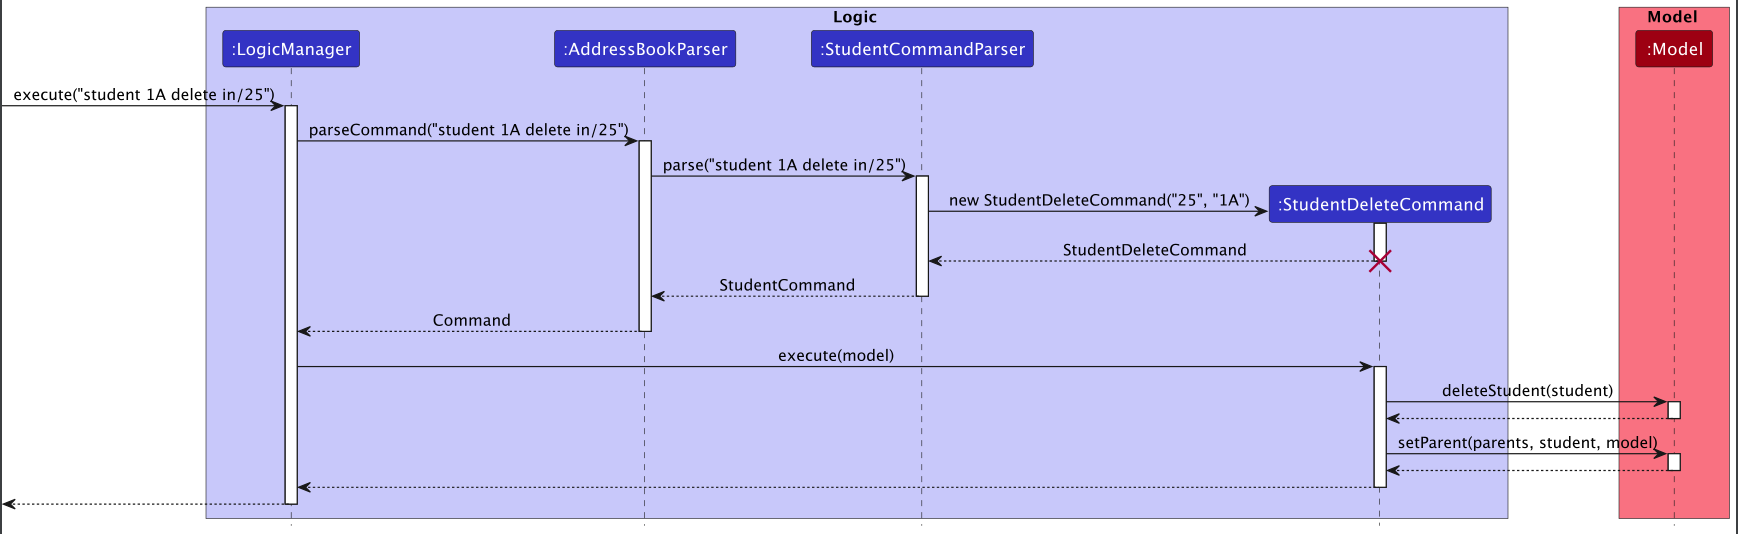
General Flow for StudentDeleteCommand
The flow for StudentDeleteCommand#execute is as such:
The StudentClass and IndexNumber to be used for deleting is retrieved from the user input
The user inputs will be parsed into the StudentCommandParser which will then return a new StudentDeleteCommand
The StudentDeleteCommand will then be immediately executed to delete the student from their UniqueStudentList via class and index number
The delete success message and result list of students will then be shown back to the user via the dashboard
Full implementation sequence diagram
Design considerations
We want to keep it simple for the user to delete students, using students’ class and index number is sufficient to identify the student that needs to be deleted.
1.Exception is thrown immediately if either student class or index number is invalid 2.Remove the student from the parent’s list of children too so the necessary changes will be displayed
Aspect: How to delete students
-
Alternative 1 (current choice): Having a studentList for each class
- Pros: When deleting students, we do not have to go through all the students stored, improving its time complexity
- Pros: More flexible to add more class related features
- Pros: Displayed list of students will be neater
- Cons: Difficult to manage
- Cons: Harder to implement
- Cons: Uses more memory
- Cons: Harder to access and manipulate student data
-
Alternative 2: Allowing the users to delete a particular field of the student
- Pros: More flexibility for users
- Cons: Hard to implement, need to check the different prefixes to determine which field to delete
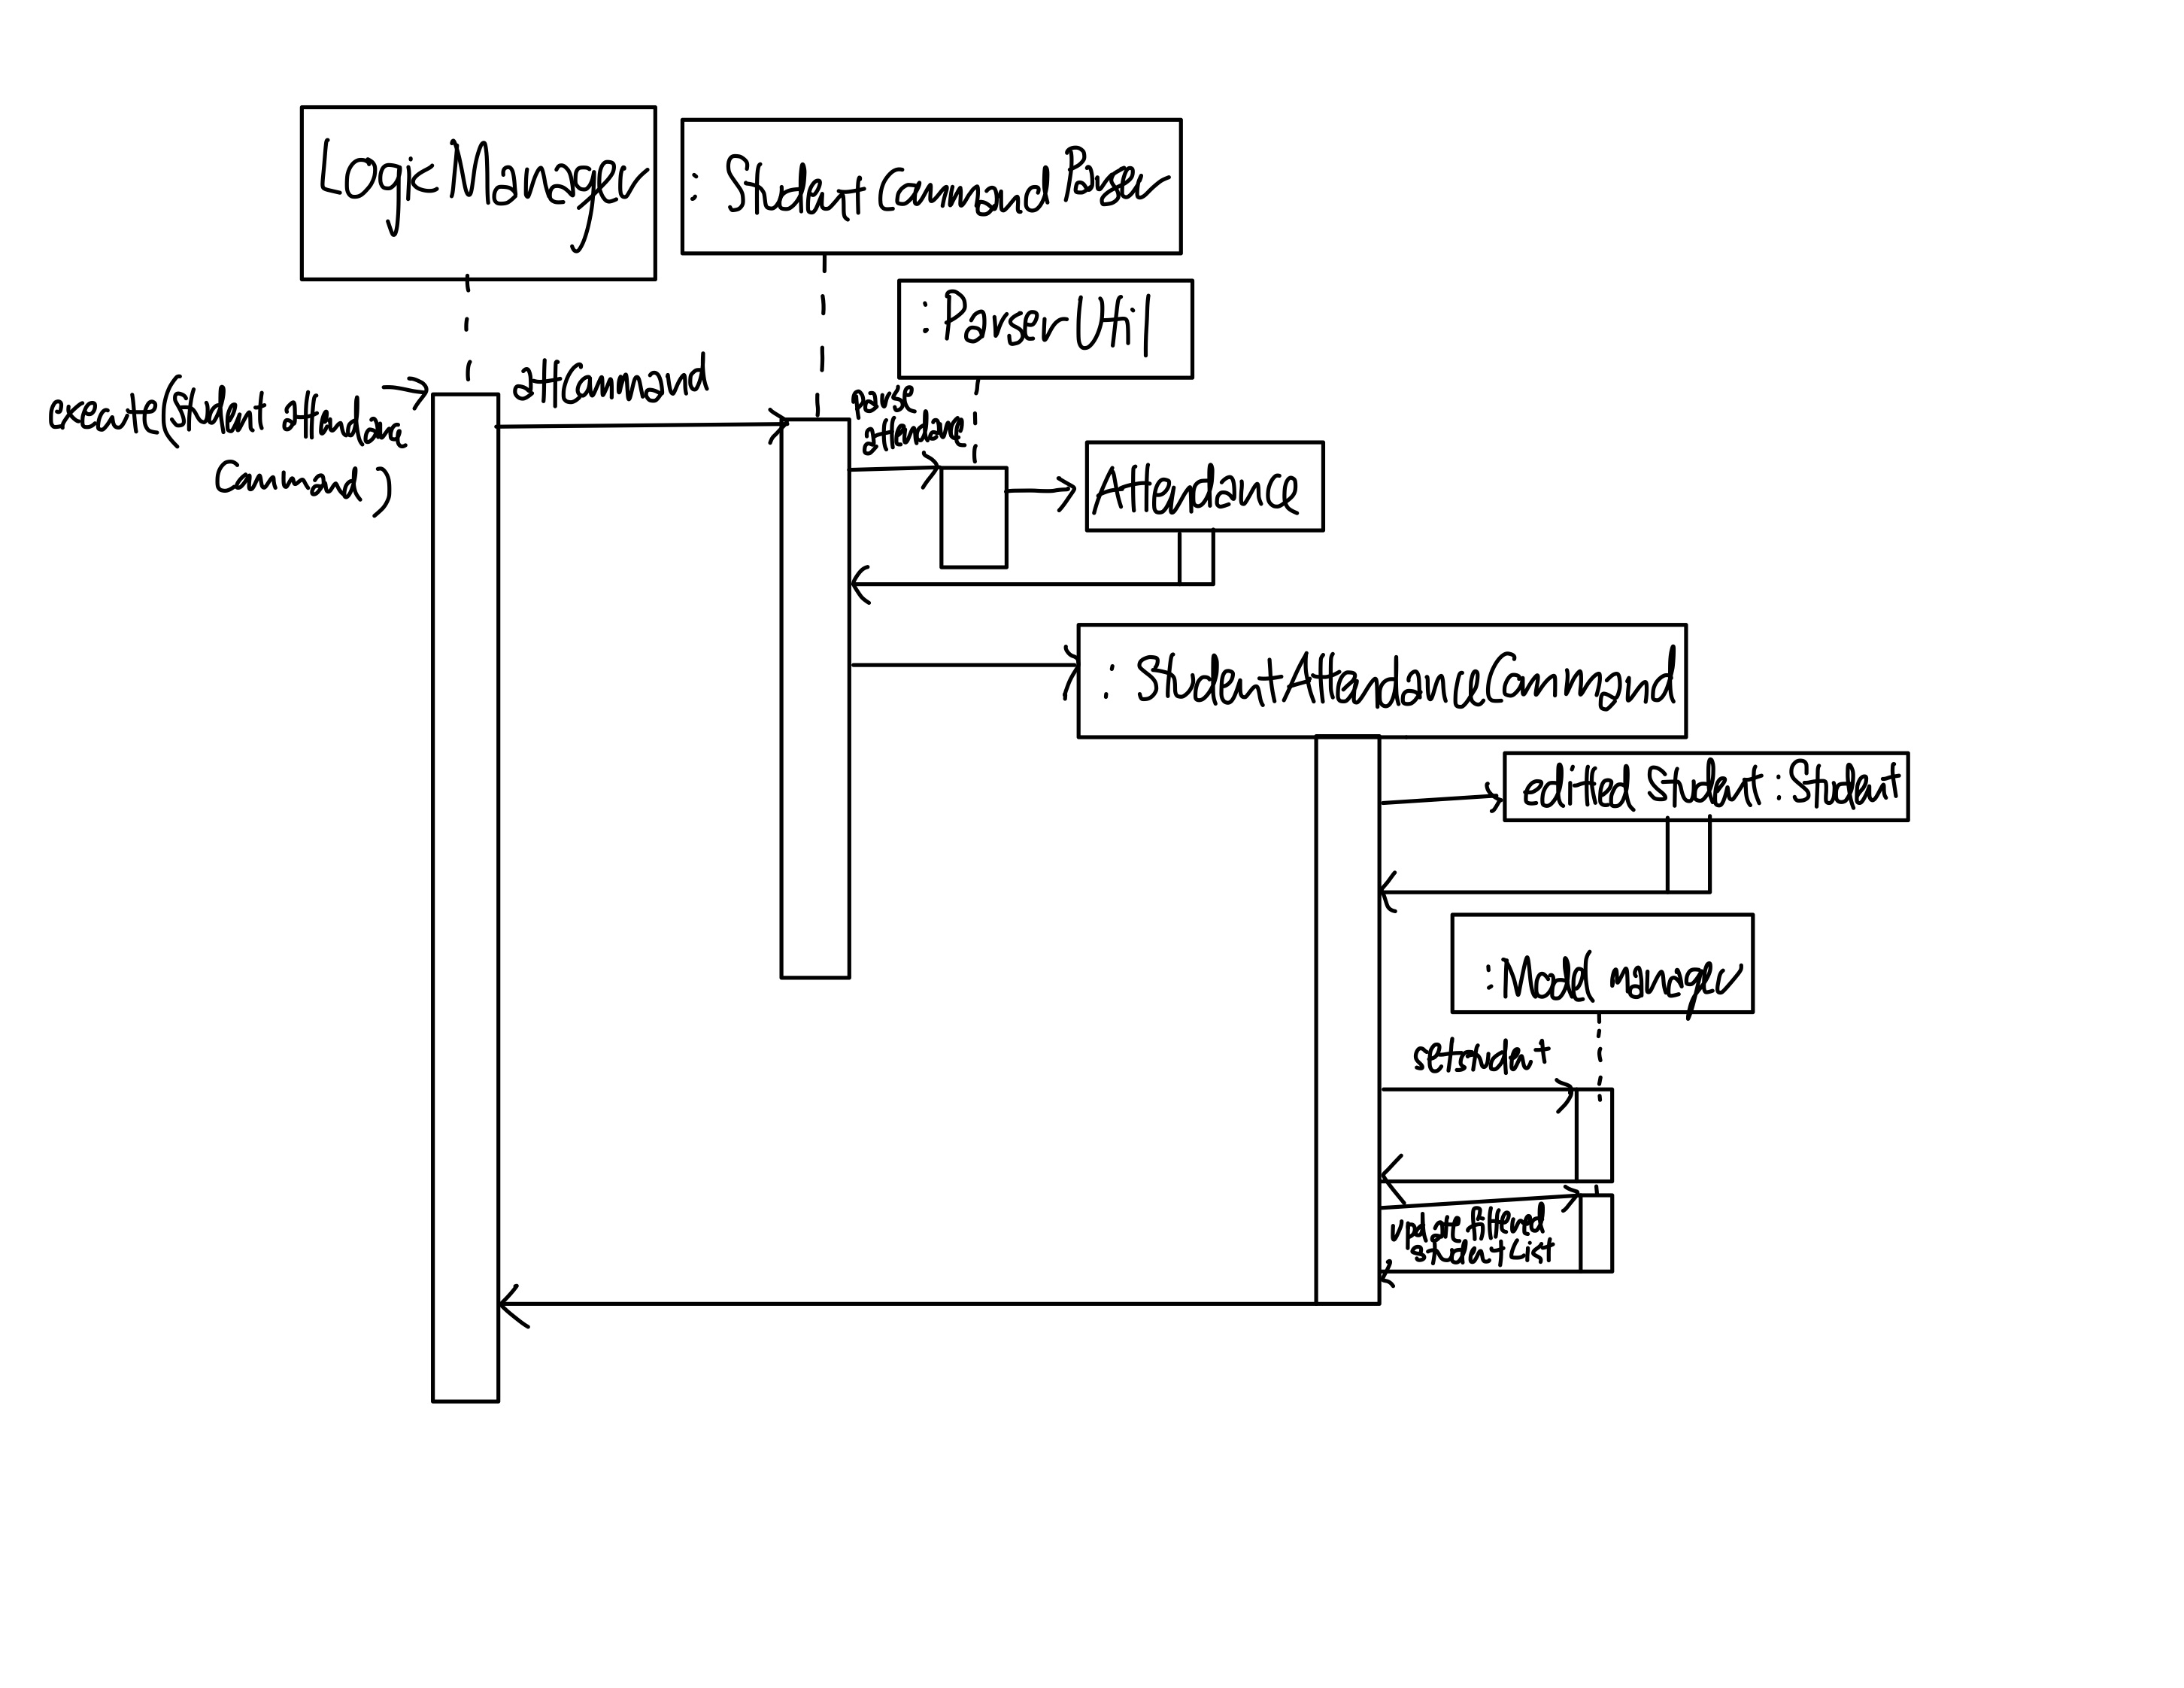
Attendance feature
Current Implementation
The attendance feature is facilitated by Attendance. It is composed by a Person with an Attendance object.
Given below is an example usage scenario and how the attendance mechanism behaves at each step
Step 1. The user launches the application for the first time
Step 2. The user creates a student using the Add command. The Attendance of Students will be initialized with the initial attendance state (F) indicating that the student is absent.
Step 3. The user wants to mark a particular student as present. The user executes the Attendance command with the index of the student and att/T. The Attendance of the student will be updated to the current date.

Step 4. The attendance is saved to the storage file automatically after each command. Attendance is saved as the string representation of LocalDate in JsonAdaptedAttendance.
Full implementation sequence diagram
Design considerations
We want to make it easy for the user to set current date as present. Thus we allowed the user to set attendance as T which will automatically register as present today
Aspect: How to store attendance
-
Alternative 1 (current choice): Store attendance as a JsonAdaptedAttendance object that records the string representation of LocalDate
- Pros: Easy to access and manipulate attendance data
- Pros: Easy to read and write to storage
- Pros: Flexible to add more features if more features are added eg. mark as MC, Late..
- Cons: Hard to implement
-
Alternative 2: Store attendance as a string representation of LocalDate
- Pros: Easy to implement
- Pros: Use less memory
- Cons: Hard to access and manipulate attendance data
- Cons: Hard to read and write to storage
- Cons: Hard to add more features if more features are added eg. mark as MC, Late..
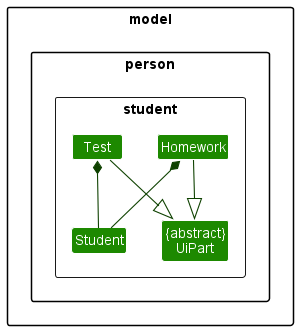
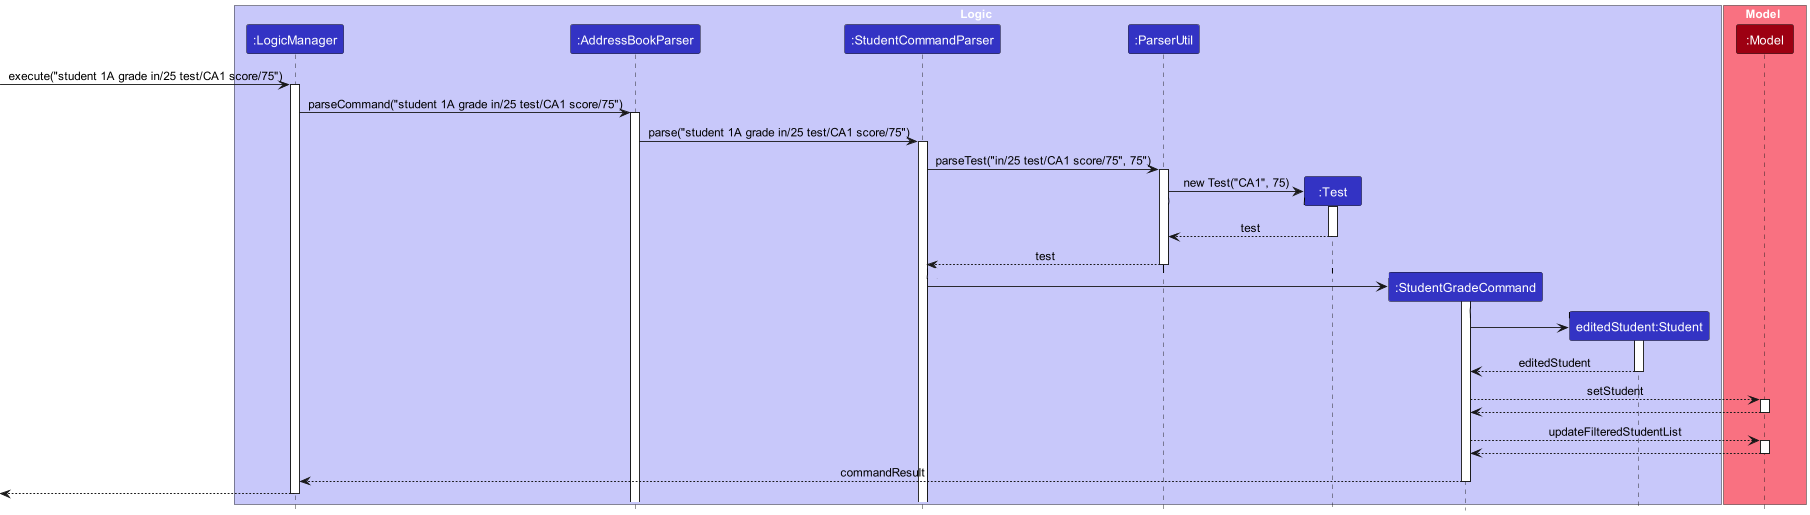
Grade feature
Current Implementation
The grade feature is facilitated by grade. It is composed by a Student with an Assignment object.
Given below is an example usage scenario and how the attendance mechanism behaves at each step
Step 1. The user launches the application for the first time
Step 2. The user creates a student using the Add command. The Test and Homework which extends Assignment of Students will be initialized with the initial name: Insert student test/homework here!, Score: -100, Weightage: -100, Deadline: No Deadline and Is Done(Homework): false.
Step 3. The user wants to add a test to a student. The user executes the grade command with the index of the student and test/TEST_NAME. The test of the student will be updated to the name.
Step 4. The test/homework is saved to the storage file automatically after each command.
Full implementation sequence diagram
Design considerations
We want to make it easy for the user to set tests without inputting all the details at one go, with the test/homework name being the only field compulsory.
Aspect: How to store test
-
Alternative 1 (current choice): Store test as a JsonAdaptedTest object
- Pros: Easy to access and manipulate attendance data
- Pros: Easy to read and write to storage
- Pros: Flexible to add more features if more features are added
- Cons: Hard to implement
-
Alternative 2: Store attendance as a string representation of Test details
- Pros: Easy to implement
- Pros: Use less memory
- Cons: Hard to access and manipulate attendance data
- Cons: Hard to read and write to storage
- Cons: Hard to add more features if more features are added
Parent/NOK Add Feature
Current Implementation
The add feature for parent/NOK is facilitated by parent add.
Given below are example usage scenarios and how the add mechanism behaves at each step.
Scenario 1:
- User launches the application.
- User wants to add a new
Parent / NOK. - User keys in the parent add command to add a new
Parent / NOKto PowerConnect. - PowerConnect creates a new
Parent / NOKand automatically saves its data into its storage file (parents.json).
Scenario 2:
- As user executes the
Student Addcommand, PowerConnect cannot locate theParent / NOKto bind to theStudent. - PowerConnect hence AUTOMATICALLY creates a new
Parent / NOK. - PowerConnect retrieves the information required for
Parent Addcommand fromStudent Addcommand. - PowerConnect automatically saves all changes into its storage files (parents.json & pcclass.json).
Activity Diagram
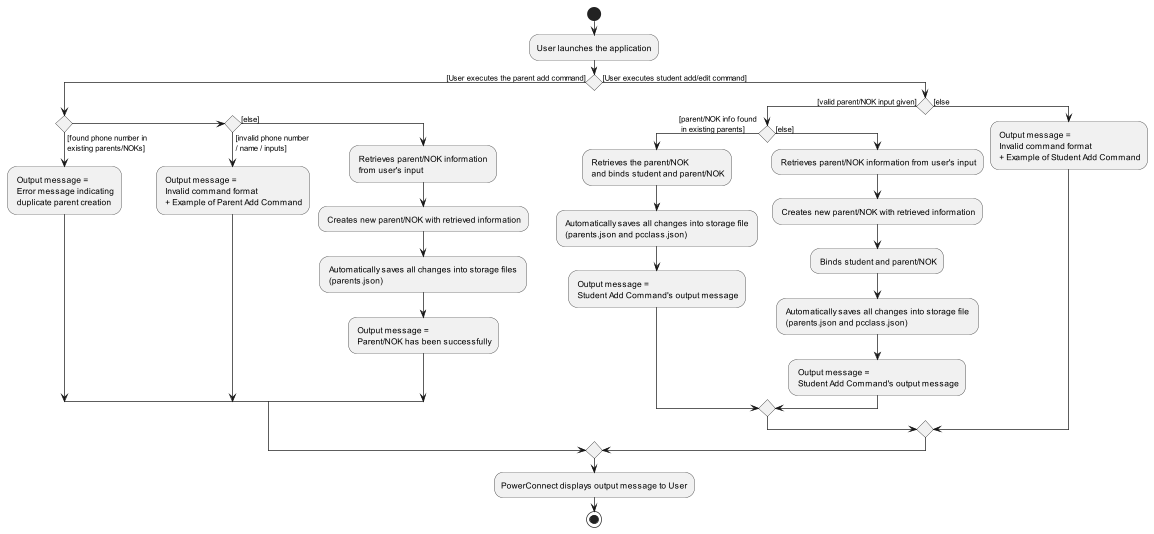
Full implementation sequence diagram
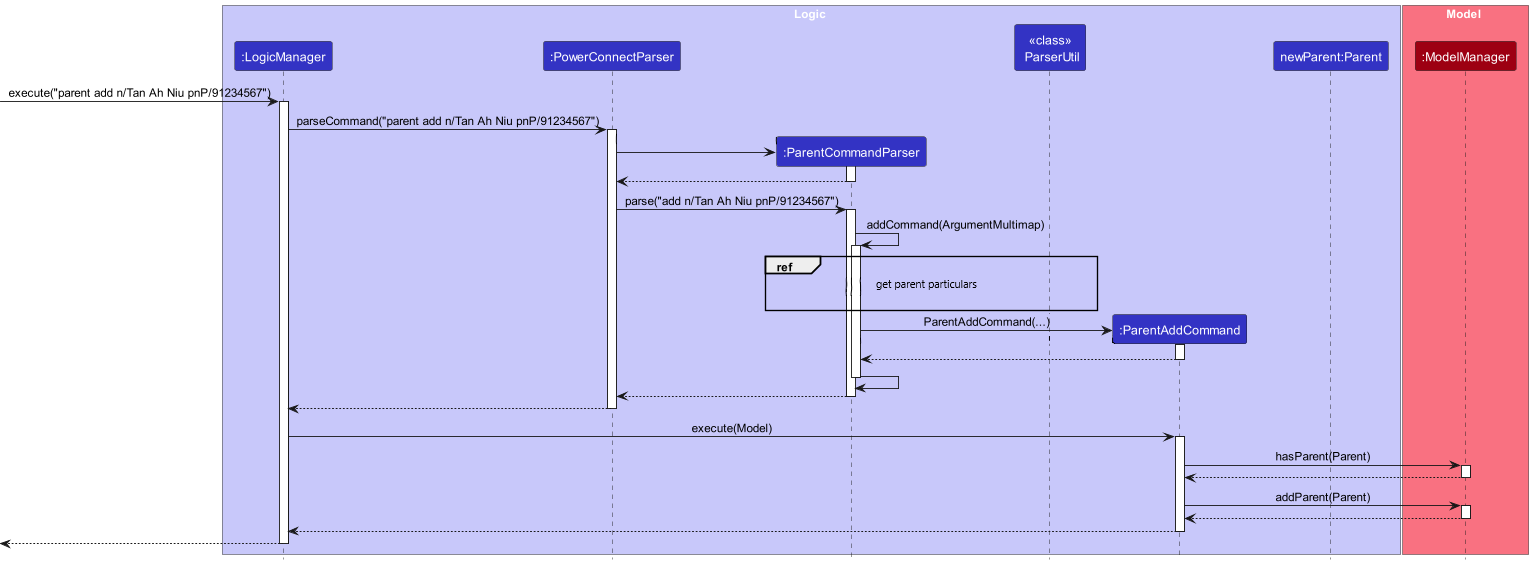
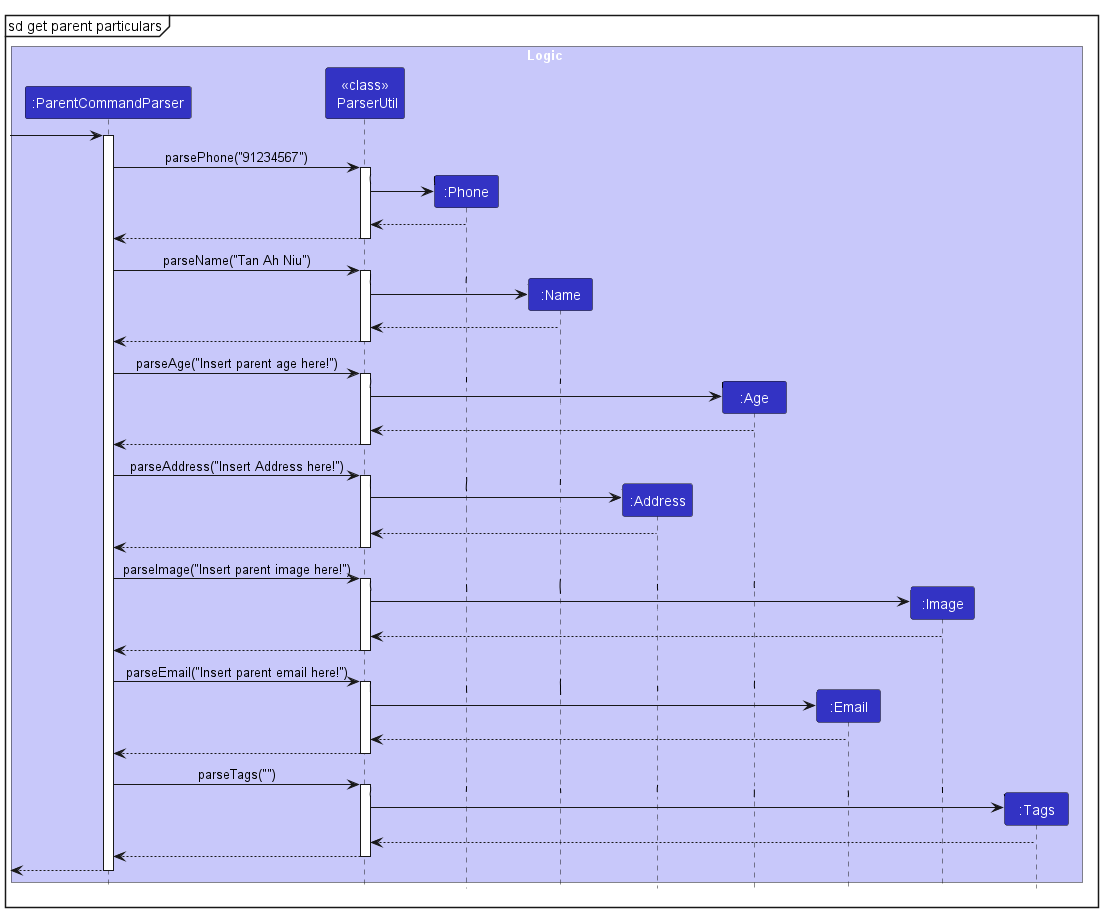
Reference to get parent particulars sequence diagram
Design considerations
We want to make it simple for users to add a new Parent / NOK to PowerConnect without having the need to include students attached to him/her.
We also want to have a centralized way and adopt defensive coding practices for binding of Student and Parent / NOK.
Furthermore, we do not want to trouble users by forcing them to have ALL particulars of a Parent / NOK. Hence, we made the command such that it ONLY requires minimal information from users:
- Parent’s / NOK’s
Name - Parent’s / NOK’s
Phone number
Aspect: How Parent Add executes
-
Alternative 1 (current choice): Users provide COMPULSORY details about the parent / NOK only + binding of student and parent / NOK is done at
Studentside ONLY- Pro: Defensive coding is applied, reducing chances of bugs
- Pro: Users are NOT FORCED to come up with arbitrary values to fill up OPTIONAL details for the parent / NOK to create a new
Parent / NOK. - Con: Hard to implement
-
Alternative 2: Users provide ALL particulars of the
Parent / NOK+ binding of student and parent / NOK is done atStudentside ONLY- Pro: Slightly easier to implement as compared to Alternative 1
- Pro: Defensive coding is applied, reducing chances of bugs
- Con: Users are FORCED to come up with arbitrary values to fill up any missing values for OPTIONAL section.
-
Alternative 3: Users provide ALL particulars of the
Parent / NOK+ binding of student and parent / NOK are done at BOTHStudentandParent / NOK- Pro: Slightly easier to implement as compared to Alternative 2
- Con: Defensive coding is NOT applied, increasing chances of bugs
- Con: Users are FORCED to come up with arbitrary values to fill up any missing values for OPTIONAL section.
- Con: Need to test the feature exhaustively / create sufficient automated tests to ensure
StudentsandParents / NOKsare properly bound together.
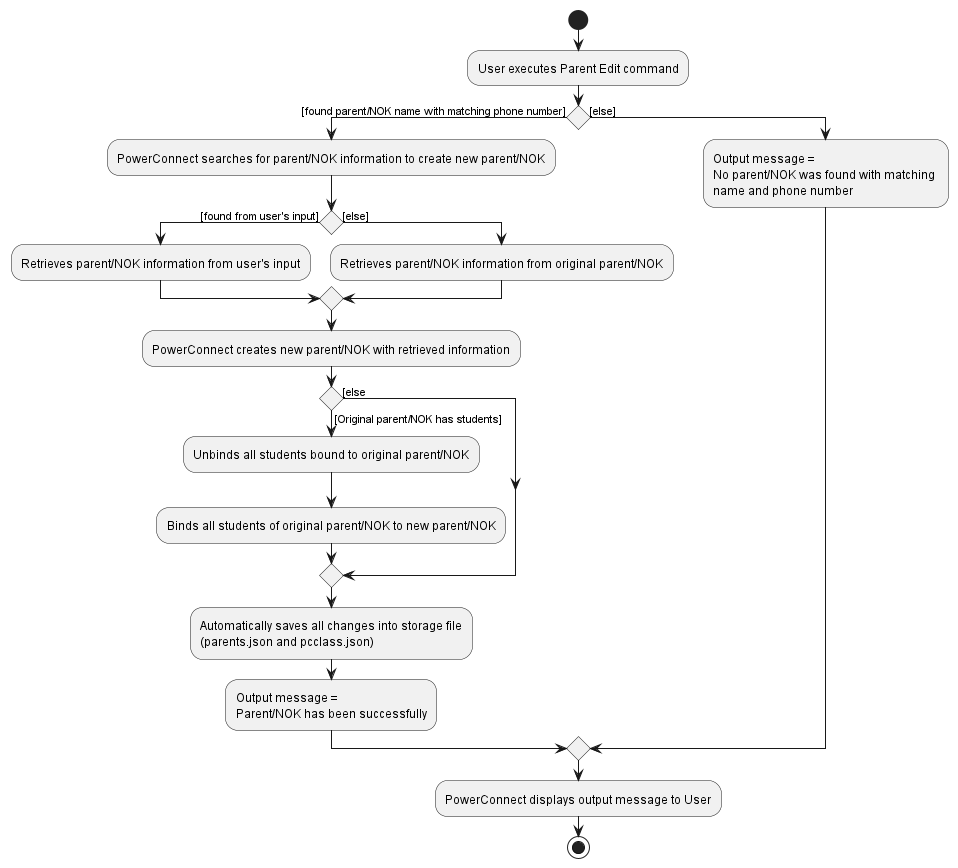
Parent/NOK Edit Feature
Current Implementation
The edit feature for parent / NOK is facilitated by parent edit.
Given below is an example usage scenario and how the edit mechanism behaves at each step.
- User launches the application for the first time.
- User creates a new
Parentusing Parent Add Command or gets a newParentcreated by PowerConnect while executing the Student Add Command.
- During creation of
Parent, User encountered one of the two scenarios and requires to edit theParent:- Did not include certain particulars of the
Parent. - Keyed in wrong particulars for the
Parent.
- Did not include certain particulars of the
- User wants to edit the
Parentparticulars and hence executes theparent editcommand with theNameandPhone Numberof the correspondingParentand theParticularsto be edited.
Example of parent edit command:"parent edit n/Tan Ah Niu pnP/91234567 npnP/65656565"
- Edited
Parentis saved to the storage file automatically after the command.
Activity Diagram
Full implementation sequence diagram
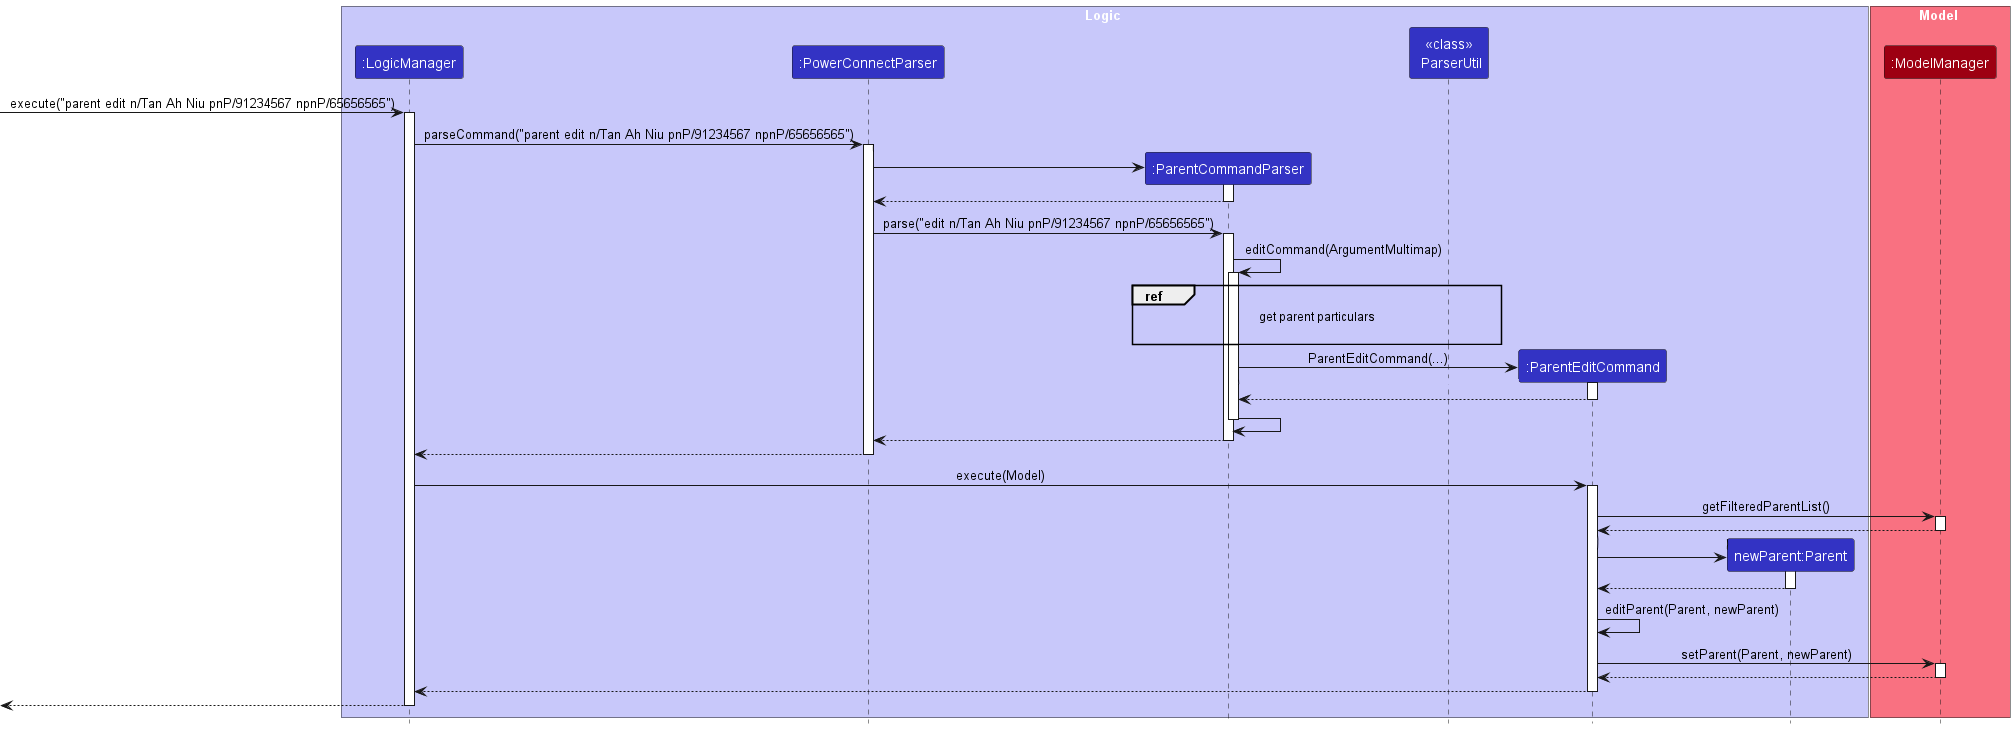
Reference to get parent particulars sequence diagram

Design considerations
We want to make it easy for users to edit Parent / NOK particulars without manually deleting the Parent / NOK and creating a new Parent / NOK and reassigning each Student attached to original Parent / NOK with the new Parent / NOK.
We also do not want to trouble user with inputting multiple PREFIXES to edit Parent / NOK. Hence, users only need to input PREFIXES belonging to the edited information and the following:
- Parent’s / NOK’s
Name - Parent’s / NOK’s
Phone Number - Particulars that are being amended
Aspect: How Parent Edit executes
-
Alternative 1 (current choice): Run the command with
parent edit n/<NAME> pnP/<PARENT_PHONE_NUMBER>+ PREFIXES and details of information that are being changed- Pro: Easy to use
- Pro: Minimal input by user to edit
Parent / NOKparticulars - Con: Slightly harder than Alternative 2 to implement
- Con: Need to test the Parent Edit Command exhaustively / come up with automated tests to ensure when creating the new
Parent / NOK, system takes input from originalParent / NOKfor particulars that are not amended.
-
Alternative 2: User provides ALL particulars of the
Parent / NOKto be edited even if SOME of the particulars are the SAME as original. From these details, system will create a newParent / NOKand replace the original copy ofParent / NOKwith it.- Pro: Easy to implement
- Pro: Makes use of existing features Parent Add and Parent Delete
- Con: Troublesome for the user as there is a need to input ALL particulars of a
Parent / NOKeven if he/she is just amending one of the particulars of theParent / NOK. - Con: It may cause regressions, user may key in wrong details for some of the
Parent / NOKparticulars as he/she is keying in the command. This will cause much inconvenience for Users especially when theParent / NOKthey are amending has TONS of information. - Con: It is no longer FAST and EASY for the user to use.
Binding Student and Parent/NOK Feature
Current Implementation
The binding feature is created with the consideration of defensive coding in mind. It is executed by PowerConnect when the following commands are executed: Student Add, Student Edit, Student Delete, Parent Edit commands.
Given below is an example usage scenario and how the edit mechanism behaves at each step.
- User executes
Student Editcommand and decides to change the parent’s/NOK’sName. - As PowerConnect executes the
Student Editcommand, PowerConnect will also retrieve the correspondingparent/NOKand perform similar behaviors toParent Editcommand to update theparent/NOKinfo in PowerConnect’s database. - PowerConnect will also perform similar behaviors of
Student Editcommand to edit theparent/NOKinformation for allStudentsthat are bound to theParent/NOK.
Design considerations
We wanted to adopt defensive coding for this feature to reduce any unwanted bugs. It is also complex when determining which party (students or parents/NOKs) should be the one performing the binding and unbinding and whether to allow both parties to perform.
Aspect: How Parent Edit executes
-
Alternative 1 (current choice): Perform the binding and unbinding MAINLY on the
Studentend as the main concern of this binding is to allow users to know the parent/NOK of a particular student.- Pro: Logical and solves the issue of pairing
studentsandparents/NOKs. - Pro: Defensive coding used.
- Pro: Less likely to cause bugs as compared to other Alternatives.
- Con: Difficult to implement.
- Pro: Logical and solves the issue of pairing
-
Alternative 2: Perform the binding and unbinding on the
Parent/NOKend when commands pertaining toParents/NOKsare executed.- Pro: Less information required for
Student Addcommand. - Con: More information required for
Parent Addcommand, resulting in requiring a long input from users. - Con: Troublesome for users.
- Con: More likely to cause bugs as compared to Alternative 1.
- Con: Difficult to implement.
- Pro: Less information required for
-
Alternative 3: Perform the binding and unbinding at BOTH
StudentandParent/NOKcommands.- Pro: Easy to implement.
- Con: Most likely to cause bugs among the Alternatives.
- Con: Did not adopt Defensive Coding.
- Con: Requires exhaustive testing and automated tests to reduce bugs.
Proposed Features
[Proposed] Undo/redo feature
Proposed Implementation
The proposed undo/redo mechanism is facilitated by VersionedAddressBook. It extends AddressBook with an undo/redo history, stored internally as an addressBookStateList and currentStatePointer. Additionally, it implements the following operations:
-
VersionedAddressBook#commit()— Saves the current address book state in its history. -
VersionedAddressBook#undo()— Restores the previous address book state from its history. -
VersionedAddressBook#redo()— Restores a previously undone address book state from its history.
These operations are exposed in the Model interface as Model#commitAddressBook(), Model#undoAddressBook() and Model#redoAddressBook() respectively.
Given below is an example usage scenario and how the undo/redo mechanism behaves at each step.
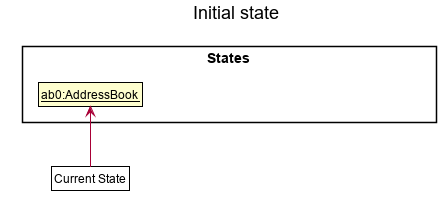
Step 1. The user launches the application for the first time. The VersionedAddressBook will be initialized with the initial address book state, and the currentStatePointer pointing to that single address book state.
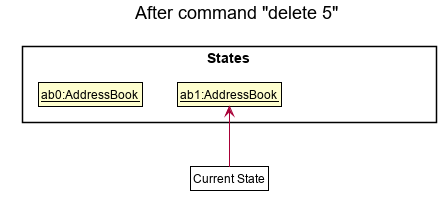
Step 2. The user executes delete 5 command to delete the 5th person in the address book. The delete command calls Model#commitAddressBook(), causing the modified state of the address book after the delete 5 command executes to be saved in the addressBookStateList, and the currentStatePointer is shifted to the newly inserted address book state.
Step 3. The user executes add n/David … to add a new person. The add command also calls Model#commitAddressBook(), causing another modified address book state to be saved into the addressBookStateList.
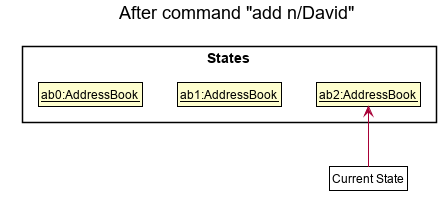
Model#commitAddressBook(), so the address book state will not be saved into the addressBookStateList.
Step 4. The user now decides that adding the person was a mistake, and decides to undo that action by executing the undo command. The undo command will call Model#undoAddressBook(), which will shift the currentStatePointer once to the left, pointing it to the previous address book state, and restores the address book to that state.
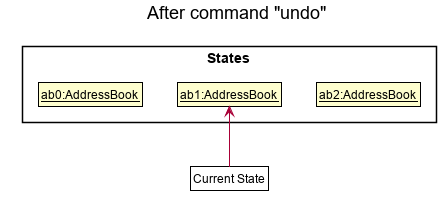
currentStatePointer is at index 0, pointing to the initial AddressBook state, then there are no previous AddressBook states to restore. The undo command uses Model#canUndoAddressBook() to check if this is the case. If so, it will return an error to the user rather
than attempting to perform the undo.
The following sequence diagram shows how the undo operation works:
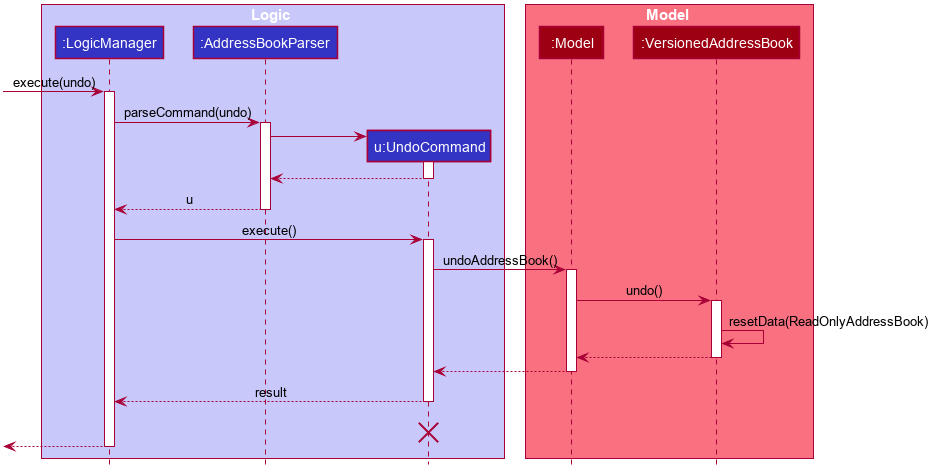
UndoCommand should end at the destroy marker (X) but due to a limitation of PlantUML, the lifeline reaches the end of diagram.
The redo command does the opposite — it calls Model#redoAddressBook(), which shifts the currentStatePointer once to the right, pointing to the previously undone state, and restores the address book to that state.
currentStatePointer is at index addressBookStateList.size() - 1, pointing to the latest address book state, then there are no undone AddressBook states to restore. The redo command uses Model#canRedoAddressBook() to check if this is the case. If so, it will return an error to the user rather than attempting to perform the redo.
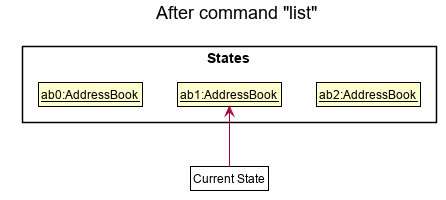
Step 5. The user then decides to execute the command list. Commands that do not modify the address book, such as list, will usually not call Model#commitAddressBook(), Model#undoAddressBook() or Model#redoAddressBook(). Thus, the addressBookStateList remains unchanged.
Step 6. The user executes clear, which calls Model#commitAddressBook(). Since the currentStatePointer is not pointing at the end of the addressBookStateList, all address book states after the currentStatePointer will be purged. Reason: It no longer makes sense to redo the add n/David … command. This is the behavior that most modern desktop applications follow.
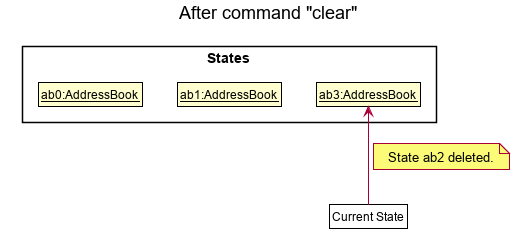
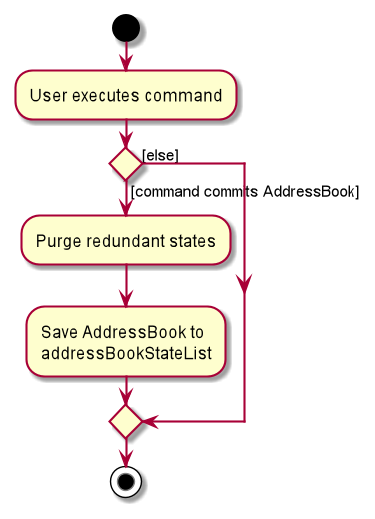
The following activity diagram summarizes what happens when a user executes a new command:
Design considerations:
Aspect: How undo & redo executes:
-
Alternative 1 (current choice): Saves the entire address book.
- Pros: Easy to implement.
- Cons: May have performance issues in terms of memory usage.
-
Alternative 2: Individual command knows how to undo/redo by
itself.
- Pros: Will use less memory (e.g. for
delete, just save the person being deleted). - Cons: We must ensure that the implementation of each individual command are correct.
- Pros: Will use less memory (e.g. for
{more aspects and alternatives to be added}
[Proposed] Data archiving
{Explain here how the data archiving feature will be implemented}
Documentation, Logging, Testing, Configuration, Dev-ops
Appendix: Requirements
Product Scope
Target user profile:
- This product mainly targets tuition teachers and in the future, secondary school teachers that prefer CLI over GUI, manage large groups of students and require ease of access to students’ information.
Value proposition:
Provides teachers with the ability to manage students administration and academics efficiently by operating on CLI, to complement existing LMS.
- Our product uses CLI instead of GUI
- Simple application for teachers to keep track of many students in different classes / co-curricular activities (CCAs) that have different phone numbers
- Our application can be used individually without internet connection (currently supports single user usage ONLY)
- Helps to keep track of students’ parents / next-of-kins’ contact information for emergency purposes
- Teachers may not be able to match students names and faces well and so this app serves as an easy way to identify students (since there are too many students)
- Streamline administration processes because there’s plenty of students’ information to keep track of (eg. attendance, assignments, grades, contact details)
User Stories
| No | As a… | I can… | So that… | Notes | Priority |
|---|---|---|---|---|---|
| 1 | Teacher | Record student’s attendance | I know that my student is present in class (in school). | High | |
| 2 | Teacher | Record students’ assessment and test grades. | I am able to manage my students’ performance | High | |
| 3 | Teacher | Have an efficient way to view and track my students’ attendance. | I will have an easier time managing my students’ attendance over the year | High | |
| 4 | Teacher | Have the option to leave some details empty | I am able to key in my students’ information when there’s missing information | High | |
| 5 | Teacher | Document students’ progress | I am able to record easily the students’ performance | High | |
| 6 | Teacher | Organise my students by class | I am able to identify which class they belong to | Determine whether to create separate classes: “class” class and “student” class or merge | High |
| 7 | Non tech-savvy teacher | Learn about new commands | I am able to use the application effectively and save unnecessary time and effort in recording students’ particulars and searching for it. | Provide User Guide that is easy to understand | High |
| 8 | Teacher | Recognise my students from different classes through their photos | I am able to recognise my students’ looks | Long setup process for user as they need to manually input images for individual student<p></p> Keeping separate file / folder for images | Medium |
| 9 | Caring Teacher | Provide comments for each student | I am able to keep track of students who need meaningful feedback and support. | (comments section on each student) | Medium |
| 10 | Teacher / teacher assistant | Have an efficient way to retrieve my students’ contact details. | I am able to contact them easily | Assumption: student details are known to teachers / TAs | Medium |
| 11 | Teacher | Keep track of students who have submitted assignment | I am aware of which student missed the deadline for their work | Medium | |
| 12 | Motivational teacher | Sort my students by overall grades | I am able to foster a positive and supportive learning environment | Medium | |
| 13 | Teacher | Use an application that is easy to navigate about and has a nice interface. | I am able to save unnecessary time and effort in recording students’ particulars and searching for it. | Issue under designs | Low |
| 14 | Responsible Teacher | Access student records, such as grades and attendance | I will be able to make informed decisions about student progress | Summary of all students grades for a particular test / class | Low |
| 15 | Busy teacher | Have a todo list | I am able to keep track of what to do | Low / NA | |
| 16 | Teacher | Use an application with a reminder system | I am able to track the things that needs to be done | NA | |
| 17 | Teacher | Efficiently and effectively assign assessments and assignments | I am able to better assess my students’ learning and progress | NA | |
| 18 | Teacher | Managing students’ behaviours and actions | I am able to promote a safe and productive learning space for all | NA | |
| 19 | Teacher | Add individual feedback to students | I am able to provide feedback to parents/guardians effectively | Duplicate point to Point 7 | NA |
| 20 | Teacher | Access my students contacts conveniently | I am able to build a closer relationship with my students and their next of kin | Too vague | NA |
| 21 | Busy Teacher | Keep track of my teaching feedback | I can keep improving my teaching practices | Hard to get school admin team on board | NA |
| 22 | Efficient Teacher | Integrate technology into my teaching | I am able to enrich my student learning | Vague | NA |
| 23 | Teacher assistant | Retrieve my students contact | I am able to look them up easily | Duplicate Point to Point 10 | NA |
| 24 | Teacher | Track the date and time of my classes | I will be able to reach my classes on time | NA | |
| 25 | Forgetful teacher | Record attendance | I am able to keep track of my students | Duplicate to Point 5 | NA |
| 26 | Teacher | Identify weaker students | I can give them more attention in class | Duplicate to Point 20 | NA |
| 27 | Teacher | Manage my consultation timings | I am able to organise my schedule | NA | |
| 28 | Teacher | Set reminders for my consultation timings | I am able to ensure I am not late for consultations | NA | |
| 29 | Teacher | Marks my students’ assignments automatically | I am able to use time and effort spent on it on other use, such as thinking of ways to improve my students’ learning | Difficult to implement Autograder | NA |
| 30 | Teacher | Have an application that is used as CLI instead of GUI | I am able to make use of my fast typing speed to sort out all the administrative work | Too Vague | NA |
| 31 | Busy Teacher | Easily manage my schedule | I am able to spend more time on other things | Out of scope | NA |
| 32 | Busy Teacher | Know which tasks to prioritise | I am able to ensure all of my responsibilities are taken care of in a timely and efficient manner. | NA | |
| 33 | Teacher | Track the date and time of the classes that I have | I am able to reach on time and teach the correct module for the particular lesson slot. | Out of scope | NA |
| 34 | Teacher | Amend date and time of certain lesson timings | I am able to change lesson dates and timings easily when lessons shift | NA |
Use Cases
For all use cases below, the System is PowerConnect and the Actor is the teacher, unless specified otherwise.
Use Case: UC01 - Adding a new student to an existing class.
Preconditions: User knows the index number for the student and the class the student belongs to has already been created.
MSS:
- User keys in ALL COMPULSORY details and any other OPTIONAL details for student’s particulars.
- System creates and adds student to respective
classand indicates success. System creates and bindsparentto the student if parent does not exist.
Extensions:
- 1a. User did not enter ALL COMPULSORY details.
- 1a1. System displays an error message to the user indicating that there is insufficient information given to create the new
studentand provides an example of what to include.
Use case ends.
- 1a1. System displays an error message to the user indicating that there is insufficient information given to create the new
- 1b. User keys in invalid COMPULSORY or OPTIONAL information.
- 1b1. User keys in invalid
SEXtype not supported by system. (m/f/M/F) - 1b2. User keys in
ageorphone numberthat are not of an integer. - 1b3. User keys in invalid path to
image. - 1b4. System displays an error message to the user indicating that he/she has keyed in wrong information for the
studentalong with a sample of the correct way to key in information for a newstudent.
Use case ends.
- 1b1. User keys in invalid
- 2a. User is trying to create a new
studentwhose index number belongs to an existingstudentin the class.- 2a1. System displays an error message to the user indicating that a student with the same index number already exists in the class.
Use case ends.
- 2a1. System displays an error message to the user indicating that a student with the same index number already exists in the class.
- 2b. Parent already exists.
- 2b1. System locates and binds the parent to the student.
Use case ends.
- 2b1. System locates and binds the parent to the student.
Use Case: UC02 - Adding grade for a student.
Preconditions: User knows index number and class of the student he/she wishes add grade for.
MSS:
- User keys in the
testname,class,index numberof student and correspondinggrade. - System displays feedback to the user that grade has been successfully added for the student.
Use case ends.
Extensions:
- 1a. User keyed in an invalid
index numberorclass.- 1a1. System displays an error message indicating the student does not exist.
- 1a2. User checks for the index number and class of the student via the student list displayed on the application and keys in the correct value.
Use case ends.
- 1b. Test name is duplicate.
- 1b1. System displays an error message indicating duplicated test name.
- 1b2. User adds a new test name.
- Use case resumes at step 2.
- 1c. User gave a
Gradevalue that is not of an integer.- 1c1. System displays an error message indicating the wrong grade given.
- 1c2. User checks and adds the grade input again.
Use case resumes at step 2.
Use Case: UC03 - Adding comment for a student.
Preconditions: User knows index number and class of the student he/she wishes to add comment.
MSS: Similar to UC02
- User keys in the
index numberandclassof student and the correspondingcommentfor the student. - System adds the comment for the student and indicates success.
Use case ends.
Extensions: Similar to UC02
- 1a. User keyed in invalid
index numberorclass.- 1a1. System displays an error message indicating the student does not exist.
- 1a2. User checks for the index number and class of the student via the student list displayed on the application and keys in the correct value.
Use case ends.
- 2a. There is an existing comment for the student.
- 2a1. System overrides the existing comment with the new comment.
Use case ends.
- 2a1. System overrides the existing comment with the new comment.
Use Case: UC04 - Listing all students in the selected class.
MSS:
- User keys in the command to view the list of all
studentsin the selectedclass. - System displays all
studentsparticulars in theclass.
Use case ends.
Extensions:
- 1a. User keys in an invalid
class.- 1a1. System displays an error message to the user informing him/her the
classis invalid.
Use case ends.
- 1a1. System displays an error message to the user informing him/her the
- 2a. Selected
classdoes not have anystudents.- 2a1. System displays an empty list.
Use case ends.
- 2a1. System displays an empty list.
Use Case: UC05 - Finding a student in a class.
Preconditions: User knows the class of the student he/she wishes to locate.
MSS:
- User keys in a section of student’s name (eg Mary Goh -
Mary) along with theclasswhere the user wishes to find from. - System finds matching students and displays it to user.
Use case ends.
Extensions:
- 1a. User did not enter ALL COMPULSORY details.
- 1a1. System displays an error message to the user indicating that there is insufficient information given to create the new
studentand provides an example of what to include.
Use case ends.
- 1a1. System displays an error message to the user indicating that there is insufficient information given to create the new
- 2a. Student does not exist in the specified
class.- 2a1. System displays an empty list.
Use case ends.
- 2a1. System displays an empty list.
Use Case: UC06 - Deleting student from class.
Preconditions: User knows the index number for the student and the class the student belongs to has already been created.
MSS:
- User keys in the student
index numberandclass. - System deletes the student from that class and indicates success.
Use case ends.
Extensions:
- 1a. User keyed in invalid
index numberorclass.- 1a1. System displays an error message indicating the student does not exist.
- 1a2. User checks for the index number and class of the student via the student list displayed on the application and keys in the correct value.
Use case ends.
Use Case: UC07 - Adding a new parent/NOK to the system.
MSS: Similar to UC01
- User keys in ALL COMPULSORY details and any other OPTIONAL details for parent’s / NOK’s particulars
- System creates parent/NOK and adds its data into system’s storage and indicates success to user.
Use case ends.
Extensions:
- 1a. User did not enter ALL COMPULSORY details.
- 1a1. System displays an error message to the user indicating that there is insufficient information given to create the new
parent/NOKand provides an example of what to include.
Use case ends.
- 1a1. System displays an error message to the user indicating that there is insufficient information given to create the new
- 1b. User keys in invalid COMPULSORY or OPTIONAL information.
- 1b1. User keys in invalid
SEXtype not supported by system. (m/f/M/F) - 1b2. User keys in
ageorphone numberthat are not of an integer. - 1b3. User keys in invalid path to
image. - 1b4. System displays an error message to the user indicating that he/she has keyed in wrong information for the
parent/NOKalong with a sample of the correct way to key in information for a newparent/NOK.
Use case ends.
- 1b1. User keys in invalid
- 2a. User is trying to create a new
parent/NOKwhosephone numberbelongs to an existingparent/NOKin the system.- 2a1. System displays an error message to the user indicating that a
parent/NOKwith the samephone numberalready exists in the system.
Use case ends.
- 2a1. System displays an error message to the user indicating that a
Use Case: UC08 - Editing an existing parent/NOK in the system.
MSS:
- User keys in parent’s / NOK’s name and phone number along with the details that are being amended.
- System retrieves the original parent/NOK, creates a NEW parent/NOK with the amended details and original particulars. At the same time, system will automatically unbind and bind all students bound to ORIGINAL parent/NOK and bind them accordingly to the NEW parent/NOK.
- System replaces the original parent/NOK with the new parent/NOK.
- System proceeds to indicate success to user.
Use case ends.
Extensions:
- 1a. User keyed in invalid
phone numberornameof the parent/NOK to be edited.- 1a1. System displays an error message indicating the parent does not exist.
- 1a2. User checks for the
phone numberandnameof the parent/NOK via the parent/NOK list displayed on the application and keys in the correct value.
Use case ends.
- 1b. User keys in invalid COMPULSORY or OPTIONAL information.
- 1b1. User keys in invalid
SEXtype not supported by system. (m/f/M/F) - 1b2. User keys in
ageorphone numberthat are not of an integer. - 1b3. User keys in invalid path to
image. - 1b4. System displays an error message to the user indicating that he/she has keyed in wrong information for the
parent/NOKalong with a sample of the correct way to key in information for a newparent/NOK.
Use case ends.
- 1b1. User keys in invalid
- 2a. User is trying to edit the
parent's/NOK'sphone numberto an existingparent/NOKin the system.- 2a1. System displays an error message to the user indicating that a
parent/NOKwith the samephone numberalready exists in the system.
Use case ends.
- 2a1. System displays an error message to the user indicating that a
Use Case: UC09 - Deleting a parent/NOK from the system.
MSS:
- User keys in parent’s / NOK’s
nameandphone number. - System locates the parent / NOK with matching
nameandphone numberand removes him/her from the system. - System proceeds to indicate success to user along with deleted
parent/NOKdetails.
Use case ends.
Extensions:
- 1a. User keyed in invalid
phone numberornameof the parent/NOK to be delete.- 1a1. System displays an error message indicating the parent does not exist.
- 1a2. User checks for the
phone numberandnameof the parent/NOK via the parent/NOK list displayed on the application and keys in the correct value.
Use case ends.
- 2a. User is trying to delete a
parent/NOKthat currently has students attached.- 2a1. System displays an error message to the user indicating that the
parent/NOKcurrently has students attached to him/her and hence CANNOT be removed from the system.
Use case ends.
- 2a1. System displays an error message to the user indicating that the
{More to be added}
</br>
Non-Functional Requirements
- Should work on any mainstream OS as long as it has Java
11or above installed. - Should be able to handle up to 400 students without a noticeable sluggishness in performance for typical usage.
- Should package it as a JAR file that is smaller than 50mb
- Should store data in a txt/csv file
- PowerConnect should be able to work without any internet access.
- PowerConnect should only be used by a single user per installation and not by multiple users.
- Users with above average typing speed for regular English text (i.e. not code, not system admin commands) should be able to accomplish the majority of the tasks faster using CLI commands than using the mouse.
- PowerConnect should be able to handle all user input errors gracefully.
- PowerConnect should be able to display all error messages in a user-friendly manner.
- PowerConnect should be able to run on a 32-bit system with 8GB of RAM.
- PowerConnect should be able to display all success messages within 1 second.
{More to be added}
</br>
Glossary
Attributes: Information of a student / parent.
For example, name, phone number, email address etc
CCA: Co-curricular activities
CLI: Command Line Interface
Hard disk: Non-volatile data storage device, your OS’s storage in short
LMS: Learning Management System, application used by schools to provide students a platform to access their lessons materials online.
Examples of LMS: Canvas, LumiNUS, Blackboard, Google Classroom, Quizlet
NOK: Refers to Next-of-Kin, could be either blood related or a guardian
OS: Operating Systems
Examples of OS: Windows, Linux, Unix, OS-X
Parameters: The actual information of a student/parent
For example, Tan Ah Kow, 91234567 etc.
{More to be added}
Appendix: Instructions for manual testing
Given below are instructions to test the app manually.
Launch and shutdown
- Initial launch
- Ensure you have Java
11or above installed in your Computer. - Download the latest
PowerConnect.jarfrom here. - Copy the file to the folder you want to use as the home folder for PowerConnect.
- In the same folder, create a new folder named “image” and store all images to be used for the program in this folder. eg student image and parent image. For the student image, it should be named
<STUDENT_NAME><CLASS><INDEX NUMBER>.png. For the parent image, it should be named<PARENT_NAME>.png. - Double click the jar file.
OR
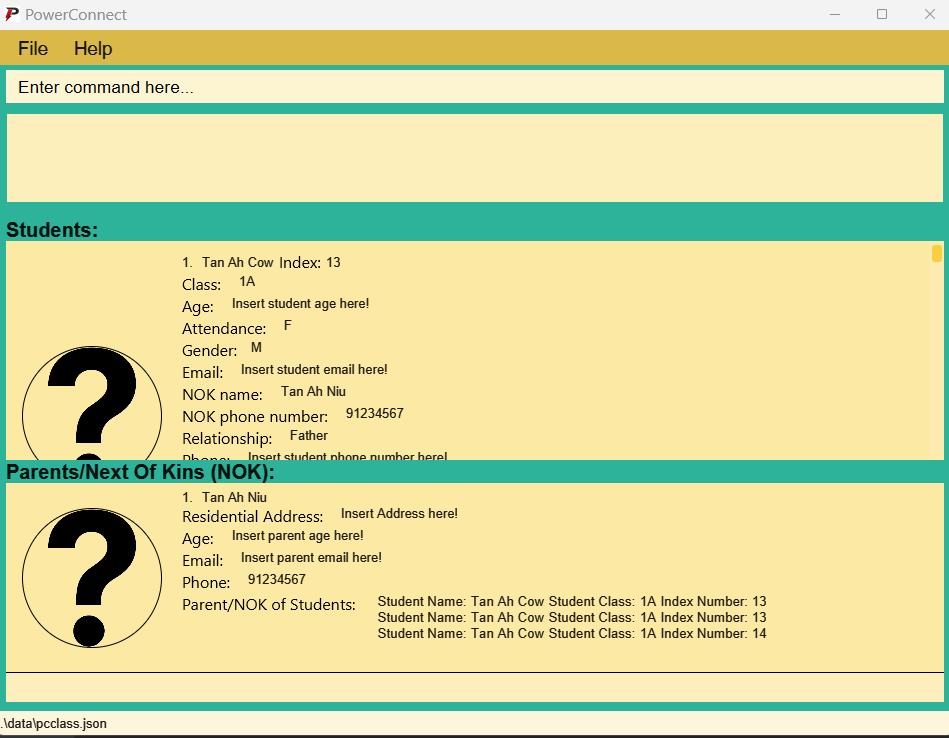
Open a command terminal,cdinto the folder you put the jar file in, and use thejava -jar PowerConnect.jarcommand to run the application. - A GUI similar to the below should appear in a few seconds. Note how the app contains some sample data. The window size may not be optimum.
- Ensure you have Java
- Saving window preferences
- Resize the window to an optimum size. Move the window to a different location. Close the window.
- Re-launch the app by double-clicking the jar file.
Expected: The most recent window size and location is retained.
- Shutdown of Application
- Run the
exitcommand:exitor press theXbutton located at the top right corner of the application. - The application should close within 3 seconds.
- Run the
jar file again.
Testers AVOID terminating the application abruptly via Task Manager, closing the application process or any other methods that is NOT mentioned in the section above on Shutdown!
Saving data
1. Dealing with corrupted files
Testers usually get corrupted files when they perform one of the FOLLOWING scenarios:
- Manually editing the storage files -
parents.jsonandpcclass.json - Stop the application abruptly without entering the
Exitcommand.
Possible Fix:
Unfortunately there is no FIX for this issue at the moment. Tester will need to manually key in or input the data file again as PowerConnect will erase the data files (parents.json & pcclass.json) upon NEXT valid command execution.
Testers should AVOID manually amending the storage files UNLESS there is an error in the
edit commands AND they are sure of how to amend the storage files!
2. Dealing with missing files
Testers usually get missing files when they perform one of the FOLLOWING scenarios:
- Changing the file / folder names (eg changing
parents.json,pcclass.json,/images/, images names)
Possible Fix:
Testers can attempt to manually locate the files and folders and ensure they are named correctly as per PowerConnect’s requirements.
Follow PowerConnect Requirements: 1. Images should be stored as
.png format and inside /data/images/.
2. Storages files should be named as parents.json & pcclass.json.
Testers SHOULD NOT change directory name for
/data/images/, ANY CHANGE to image renaming should also be updated via the edit commands and storage files (parents.json & pcclass.json`) SHOULD NOT be renamed.
Deleting a person
-
Deleting a person while all persons are being shown
-
Prerequisites: List all persons using the
listcommand. Multiple persons in the list. -
Test case:
delete 1
Expected: First contact is deleted from the list. Details of the deleted contact shown in the status message. Timestamp in the status bar is updated. -
Test case:
delete 0
Expected: No person is deleted. Error details shown in the status message. Status bar remains the same. -
Other incorrect delete commands to try:
delete,delete x,...(where x is larger than the list size)
Expected: Similar to previous.
-
-
{ more test cases … }